这篇文章主要讲解关于架构的一些思考,通过这篇文章你将了解到
- MVC
- MVC变种
- MVP
- MVVM
- 分层设计的优缺点
没有最好的架构,只有最适合业务的架构。
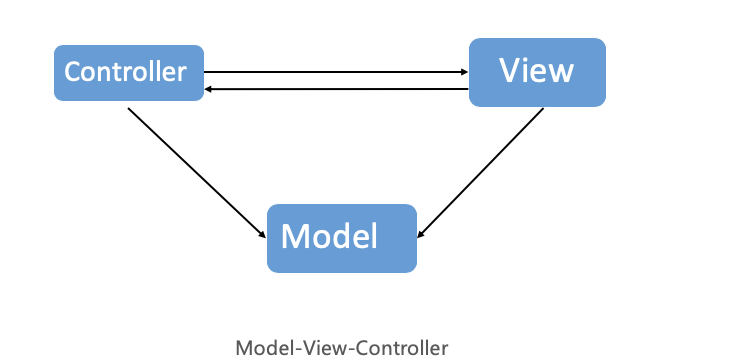
MVC
苹果版本的MVC是Model和VC和交互,VC和View交互
优点:
View和Model可以重复利用,可以独立使用缺点:
Controller的代码过于臃肿

代码:
1 | - (void)viewDidLoad { |
这里是VC中组装了tableview,model的数据在VC中在view中显示出来,当需要另外的数据的时候,只需要将model改成需要的model而无需更改tableview的代码兼容性较好。
MVC变种
MVC变种,其实就是将model和view建立了联系,view依据Model来展示数据,VC组装Model,组装展示是在view中实现。
优点:对Controller进行瘦身,将View的内部细节封装起来了,外界不知道View内部的具体实现
缺点:view依赖于Model
代码实现
1 | //.h |
可以看到model组装到view展示内容是在view实现的,外部不知道细节,只需要将model给view即可,但是只能传输过来model或者他子类,业务更改的话,需要修改view的内部model才能将变更过的数据重新展示出来。
想要监听view的点击事件来做一些操作,那么我们可以使用代理和block,这里id是实现了FYAppleViewProtocol协议的,weak修饰防止循环引用,使用协议实现了和VC的通信。
1 | @class FYAppleView; |
稍作更改还是apple-MVC
1 | // .h |
将View属性nameLabel暴露出来,但是不允许外界进行更改,去掉model则是MVC。
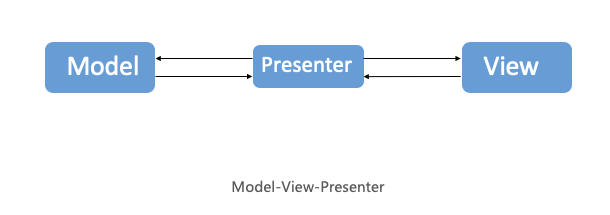
MVP
MVP和MVC很像,只是将VC换成了Presenter,vc和Present做的事情基本一致,将view和Model通信改到了都和Presenter通信。
代码
1 | //MVP |
再次对VC进行了瘦身,将更多的业务逻辑搬到了FYNewsPresenter处理,其实全部搬过去,意义比不大,FYNewsPresenter也会臃肿,也会出现和VC一样的困惑。
MVVM
MVVM是将FYNewsPresenter都搬到了FYNewsViewModel中,然后对FYNewsViewModel和View进行了一个双向绑定,双向绑定可以使用代理,block或者KVO实现。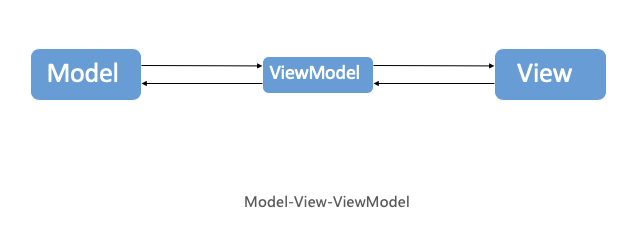
代码实现
1 | @interface FYNewsViewModel : NSObject |
在view实现
1 | @class FYAppleView,FYNewsViewModel; |
使用KVO或者FBKVO或者RAC都是可以的,本章节例子给出了FBKVO或者自己使用KVO的实现。
分层设计
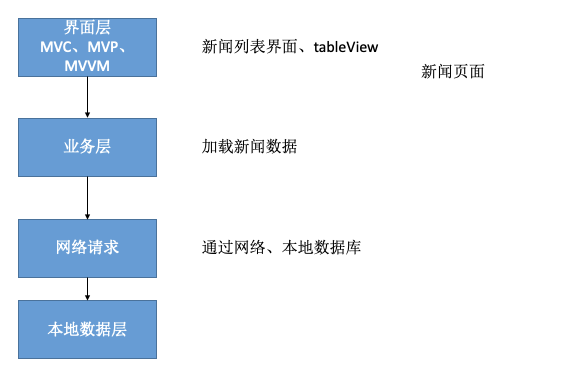
三层架构:
三层架构(3-tier architecture) 通常意义上的三层架构就是将整个业务应用划分为:界面层(User Interface layer)、业务逻辑层(Business Logic Layer)、数据访问层(Data access layer)。区分层次的目的即为了“高内聚低耦合”的思想。在软件体系架构设计中,分层式结构是最常见,也是最重要的一种结构。微软推荐的分层式结构一般分为三层,从下至上分别为:数据访问层、业务逻辑层(又或称为领域层)、表示层
目的: “高内聚,低耦合”的思想
优点: 降低层与层之间的依赖 标准化
缺点: 系统架构复杂,不适合小型项目
三层原理
3个层次中,系统主要功能和业务逻辑都在业务逻辑层进行处理。
所谓三层体系结构,是在客户端与数据库之间加入了一个中间层,也叫组件层。这里所说的三层体系,不是指物理上的三层,不是简单地放置三台机器就是三层体系结构,也不仅仅有B/S应用才是三层体系结构,三层是指逻辑上的三层,即把这三个层放置到一台机器上。
三层体系的应用程序将业务规则、数据访问、合法性校验等工作放到了中间层进行处理。通常情况下,客户端不直接与数据库进行交互,而是通过
COM/DCOM通讯与中间层建立连接,再经由中间层与数据库进行交互。
三层架构中主要功能与业务逻辑一般要在业务逻辑层进行信息处理和实现,其中三层体系架构中的客户端和数据库要预设中间层,成为组建层。三层架构中的三层具有一定的逻辑性,即是将三层设置到同一个计算机系统中,把业务协议、合法校验以及数据访问等程序归置到中间层进行信息处理,一般客户端无法和数据库进行数据传输,主要是利用
COM/DCOM通讯和中间层构建衔接通道,实现中间层与数据库的数据传输,进而实现客户端与是数据库的交互
MVC、MVVM、MVP属于界面层,
当业务复杂,网络请求和db操作达到了一个新的高度,界面复杂到需要好多人来做,那么界面、业务、数据需要分层了
分层之后,得到了一个三层架构或四层架构
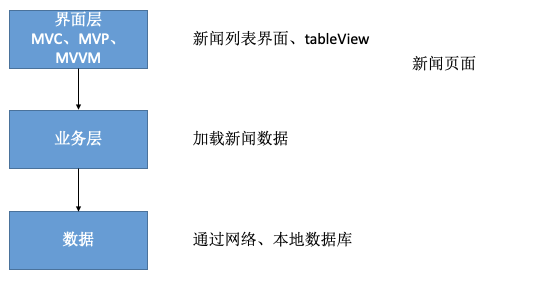
数据层也可以分为两层,分为网络请求和db层。
具体在工程中我们通常这样体现
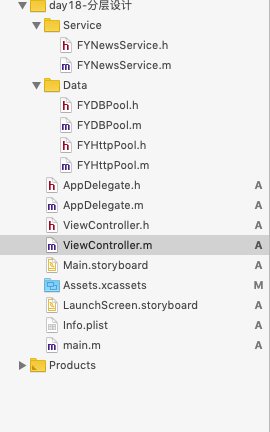
在vc中获取数据
1 | @interface ViewController () |
在业务层
1 | @interface FYNewsService () |
在db层
1 | typedef void(^succcessCallback)(NSArray *); |
在网络请求层
1 | typedef void(^succcessCallback)(NSArray *); |
分层目的是瘦身,逻辑清晰,业务清晰,降低耦合,当某一块足够复杂时候,都可以进行分层,不局限于网络或db,当db足够复杂,也需要进行一个分层来解决复杂调用和处理的问题。
不同的人来处理不同的分层,相互影响也比较小,降低耦合。
当逻辑层足够完善,则UI层如何变动都不需要更改逻辑层。
后记
优雅的代码总是伴随着各种传统设计模式的搭配
设计模式
设计模式(Design Pattern)
是一套被反复使用、代码设计经验的总结
使用设计模式的好处是:可重用代码、让代码更容易被他人理解、保证代码可靠性
一般与编程语言无关,是一套比较成熟的编程思想
设计模式可以分为三大类
创建型模式:对象实例化的模式,用于解耦对象的实例化过程
单例模式、工厂方法模式,等等结构型模式:把类或对象结合在一起形成一个更大的结构
代理模式、适配器模式、组合模式、装饰模式,等等行为型模式:类或对象之间如何交互,及划分责任和算法
观察者模式、命令模式、责任链模式,等等
总结
- 适合项目的才是最好的架构
资料参考
最怕一生碌碌无为,还安慰自己平凡可贵。
广告时间
